Save Time and Money By Replacing Your Old Lockwire System with Safe-T-Cable.™
|
 System Benefits
1. ThreadA Cable Assembly is threaded through the fasteners in a direction which will exert a positive or neutral pull when tension is applied. |
 |
2. InsertThe ferrule is threaded on the cable and the cable is inserted through the tool nose. |
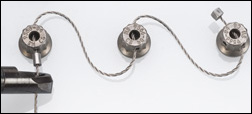 |
3. TensionCorrect tension is applied with the tool. |
 |
4. Crimp and CutThe ferrule is firmly crimped, and the cable is cut flush with the end of the ferrule. |
 |
5. Job is FinishedThe job is complete. A secure installation in a fraction of the time it takes to install safety wire. |
 |
More Information About Safe-T-Cable™
Components: Kits, Cable Assemblies, & Ferrules